


I have been on a mission the last few weeks to come up with an egg-free, autoimmune paleo-friendly biscuit that uses gelatin as the egg replacement. I've cooked up some delicious creations, but sadly none of them have looked like biscuits -- instead, they fall flat and end up looking more like smooshed cookies!
Baking soda doesn't make them rise. Baking soda + apple cider vinegar doesn't make them rise. Homemade grain-free baking powder doesn't make them rise.
But, you know what? That's ok! Because they taste GREAT.
And that's why I'm calling them Savory Breakfast Cookies. A few followers on Instagram and Facebook suggested "Biskies", which is super cute. Whatever you want to call them, they really do work well as a savory breakfast bread and taste delicious!
I'm also experimenting with a sweet version -- actual cookies. Stay tuned for the results of that!

I actually think that these would work really well as muffins (with a good parchment paper liner to help with sticking), but I do not currently own a muffin pan so I can't test that theory out.
Gelatin as an Egg Substitute

It's really kind of amazing to see how the gelatin instantly thickens the batter. I shot a video on Instagram showing how adding liquid gelatin transforms the batter.
**IMPORTANT NOTE**
You MUST use the red can of Great Lakes gelatin for this -- do NOT use the green "collagen hydrolysate" as it will NOT work! Collagen hydrolysate does not firm up and set liquid the way that gelatin does. The batter will never come together if you use the green can and it will stay in a completely liquid state. I recommend Great Lakes brand for gelatin because it comes from grass-fed cows.
I did this for effect -- mixing everything but the gelatin together, then adding the liquid gelatin -- you should actually mix all the wet ingredients together and THEN add them all at once to the dry. But, wasn't that cool to see?
These biscuits DO take a long time to cook, but trust me: if you try to take them out sooner, they will stick to the pan and completely fall apart. They really do need around 45 minutes in the oven to hold their shape.
Also, you really do need to use parchment paper with these to avoid a sticky mess on your pan. This is the kind that I use:

You can save these for leftovers and reheat them in the oven for a few minutes. I wouldn't eat them cold, like you can with biscuits made from eggs because they have an odd texture when cooled (think Jello bread, LOL!) While they are handy to have to heat up as leftovers, they taste the best fresh from the oven. They will also get a lot crunchier the second time they are heated up. Not a bad thing, just different from the fluffy texture they have when first baked.
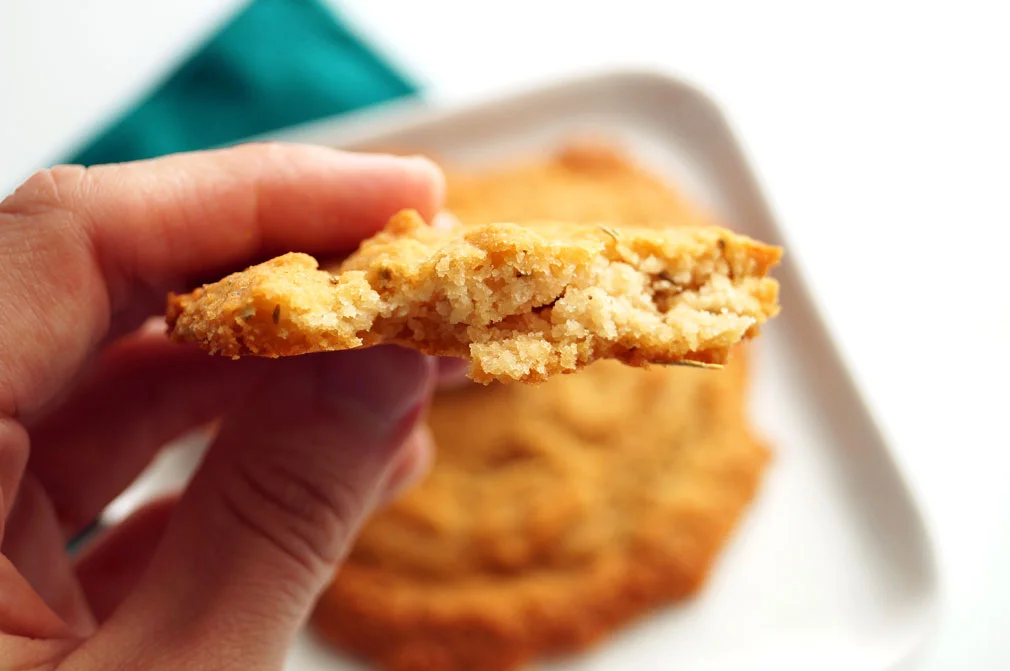
The texture and mouth feel of these is definitely unique. I describe the texture as being light and airy with a gentle crunch that's absent if they are made with eggs. Both my husband and I really enjoy these!
And yes, these are definitely high fat, low carb. Actually, they are suitable if you are following a Ketogenic diet! I notice that when I eat these for breakfast I am satiated for HOURS. Making them with all coconut oil gives them too much of a coconut taste. The olive oil lends a somewhat buttery flavor that helps keep these savory. Don't fear good fats :-)


Savory Breakfast Cookies (aka flattened biscuits)
Prep time: 15 minutes
Cook time: 40-45 minutes
Total time: 55-60 minutes
Yield: 12
Ingredients
- 1/2 cup coconut flour
- 1/2 tsp baking soda
- 1/2 tsp unrefined salt
- 1 tsp dried rosemary
- 1 tsp dried granulated garlic
- 4 Tbsp extra-virgin olive oil
- 6 Tbsp coconut oil
- 4 Tbsp gelatin (Great Lakes brand is from grass-fed cows)**NOTE: Do NOT use the green "collagen hydrolysate" -- it won't work!
- 1 cup room temperature filtered water
- 1/2 Tbsp raw apple cider vinegar
- parchment paper
Cooking Directions
- Preheat oven to 350F.
- Prepare your gelatin for use. First, you will have to "bloom" it, then you will melt it. Add water to a small pot and sprinkle/rain gelatin on top, about 1/2 Tbsp at a time in a single layer. Do NOT let it clump or pour it all in one place. You want to spread it out evenly. If not, clumps may form that are difficult to dissolve and the texture in the final product will be negatively affected. Be patient with this part! I use a whisk and vigorously stir the gelatin after each 1/2 Tbsp has been added and wetted. Once all gelatin has been wetted, heat over medium low for several minutes until all gelatin has melted and you have a translucent liquid. Stir occasionally with your whisk until dissolved.
- While you are waiting on the gelatin to melt, mix all dry ingredients together in a large bowl. I recommend sifting the coconut flour to remove any clumps. Be sure to evenly distribute the baking soda throughout.
- Once gelatin is completely dissolved, add remaining wet ingredients to gelatin (oils and apple cider vinegar), then pour all wet ingredients into the bowl with your dry ingredients and stir with a large spoon. At first, the batter will seem like it is going to be too runny, but as you stir it the batter will thicken up and soon look like a normal batter.
- Use your spoon to divide batter into 12 cookies/biscuits onto a parchment paper-lined baking sheet (trust me -- do NOT skip the parchment paper!) Bake at 350F for about 40-45 minutes, or until the cookies are golden and the edges are slightly browned and you can easily lift them with a spatula. If they stick to the paper or come apart in the middle, they are not ready yet. For some reason, the gelatin makes these have a longer cooking time than they would have if made with eggs.
- Serve immediately and enjoy! Store leftovers in an air-tight container and reheat in the oven for several minutes before serving. I do not recommend eating them cold as they do not have a great texture. They will be crispier the second time they are heated, too.
- NOTE: Be sure to wash your pot, whisk, bowl, spoon, and anything else that touched the gelatin right away. If you let it sit, the gelatin will harden and become much harder to clean!
Recommended Ingredients
This post contains affiliate links for things that I use in my own kitchen and believe you will enjoy, too. My full affiliate disclosure is here. Thanks for your support! :-)


Keep In Touch!
Want to learn a LOT more about gelatin?
If you want to get really in depth with health benefits of consuming gelatin and get a TON of recipes, you should check out this fantastic new e-book from Sylvie at Hollywood Homestead. I received a review copy and I am just blown away at how comprehensive it is! Not only is it full of wonderful information (150 pages worth!), it also is beautifully laid out with stunning photographs that make you just want to eat up all the recipes ASAP! If you are serious about getting your daily dose of gelatin in a variety of creative and delicious ways, this is the resource for you. Click here to learn more about it.


