Gua Sha, also known as “coining”, “skin scraping”, or “pressure stroking” is an ancient instrument-assisted massage technique utilized in Traditional Chinese Medicine. The best way to learn how to do gua sha on the face is by watching, so I’ve included an in-depth video tutorial at the end of this post.
When done on the face, gua sha can reduce fine lines and wrinkles, restore firmness and elasticity, promote a brighter complexion, relieve jaw tension, promote lymphatic drainage, and decrease puffiness. It can also help with sinus congestion and I find that when I do it in the morning it helps with mental clarity and reducing brain fog.
Here is how gua sha was described in the Journal of the American Medical Association (JAMA) Dermatology in 2018 by Marion et al.:
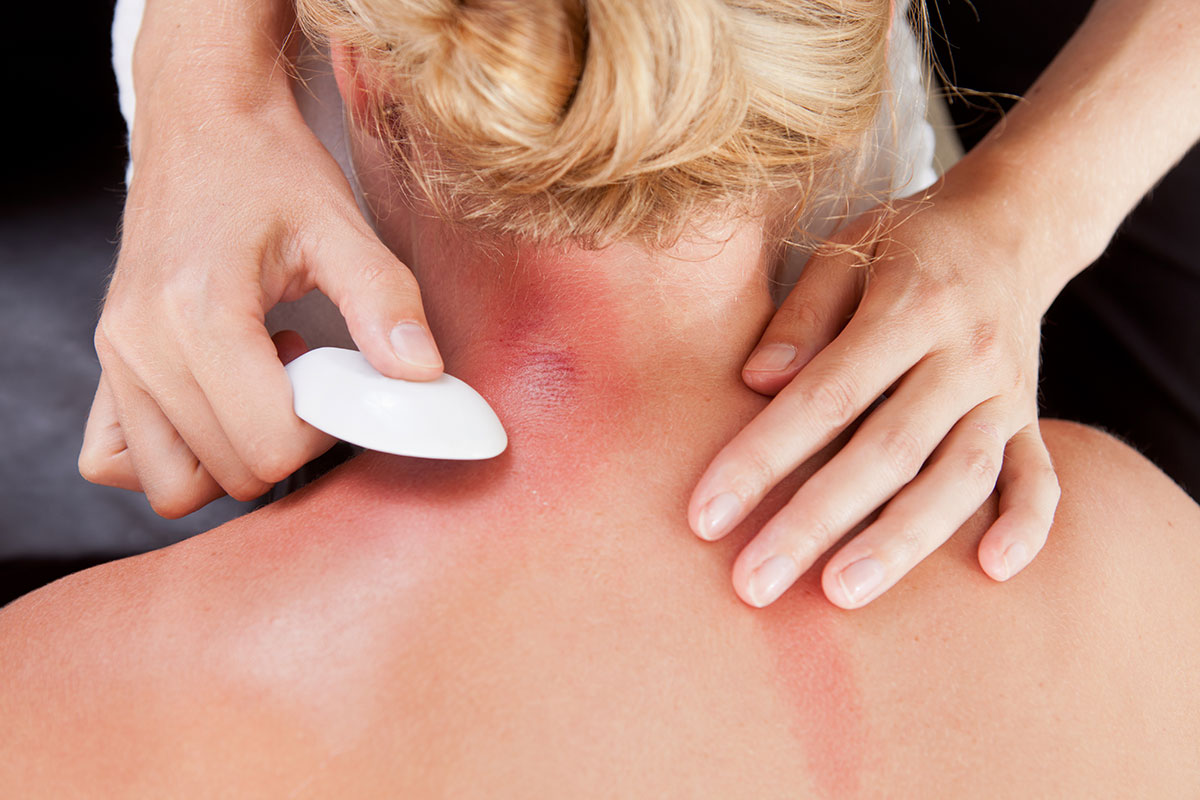
“Coining, also known as gua sha, is a Chinese tradition that can be quite alarming when spotted by the unfamiliar eye. This unique Southeast Asian medical tradition encompasses scraping of the skin, typically lubricated with warm massage oil, with a worn-down coin or Chinese soup spoon to produce transient petechiae and ecchymosis. These hardy objects with smooth edges allow the healer to rub the skin in a linear fashion, creating red striations. The definition of gua is “scraping.” Sha is defined as sand or sharkskin, to describe the feeling of the skin after gua sha.”
Important note: gua sha on the body (back, shoulders, and neck are the most common areas) and gua sha on the face are performed quite differently. While the point of gua sha on the body is to draw out transient therapeutic petechiae, you do not want to do that when practicing on your face.
And a quick disclaimer: this post is shared for informational purposes only and is not to be misconstrued as medical advice nor is it intended to diagnose or treat any medical condition. Talk to your healthcare provider if you have questions or concerns.
Why I Began Doing Facial Gua Sha
My acupuncturist instructed me to do facial gua sha in 2018 when I was dealing with some troubling symptoms related to my vision (light sensitivity) and eyes (dryness) as well as eyestrain.
I also have chronically reactive lymph nodes behind my ears and many tender points on my face (especially in front of my ears and along my hairline) which correspond to specific acupuncture points that he told me I would benefit from stimulating daily with gua sha.
I didn’t expect to notice so many positive cosmetic changes in my face and skin as a side effect!
Body vs Facial Gua Sha
Body gua sha deserves its own blog post and literature review, and I have previously written about how I use gua sha on my back and neck as part of my ‘anti-crud protocol’, which you can read here.
You can also see a video demonstration of gua sha on the back on my Instagram highlights by clicking here.
In Chinese medicine, gua sha on the upper back, shoulders, and neck is a common treatment for colds, influenza, and fevers. In my own tenure as a patient of Chinese medicine, I have been advised to do it as a preventative measure if I’ve been exposed to someone who is sick or if I feel a virus coming on.
If you are interested to know more about the science of body gua sha, this is a great overview of the scientific literature up to the year 2015, which includes studies that have found gua sha to effective in treating back and nec kpain, migraines, liver inflammation, perimenopausal symptoms, and breast distention/mastitis.
A few other interesting papers have been published since then, including this study by Min et al. 2018 that found gua sha to “dramatically” inhibit expression of pro-inflammatory cytokines, including TNF-a, IL-6, and IL1B in a rat model of lumbar disk herniation.
And Saha et al. just published in Feb 2019 a randomized controlled trial that showed gua sha to be a safe and effective treatment for chronic low back pain. Here is a quote from that paper about the known benefits of gua sha:
“It has been demonstrated that Gua Sha treatment increases surface microperfusion in the treated areas by 400% and that the resulting extravasated blood in the capillary bed is associated with an up-regulation of the heme oxygenase-1 (HO-1) gene expression. In a mouse model, this immediate effect is sustained for at least five days. An up-regulation of HO-1 has both cytoprotective and anti-nociceptive effects, as well as anti-inflammatory and immunoregulatory properties. ”
Facial gua sha won’t upregulate HO-1, though, since it does not draw out transient therapeutic petechiae. So what are the benefits of facial gua sha?
Facial Gua Sha for lymphatic drainage And To Relieve Muscle Tension
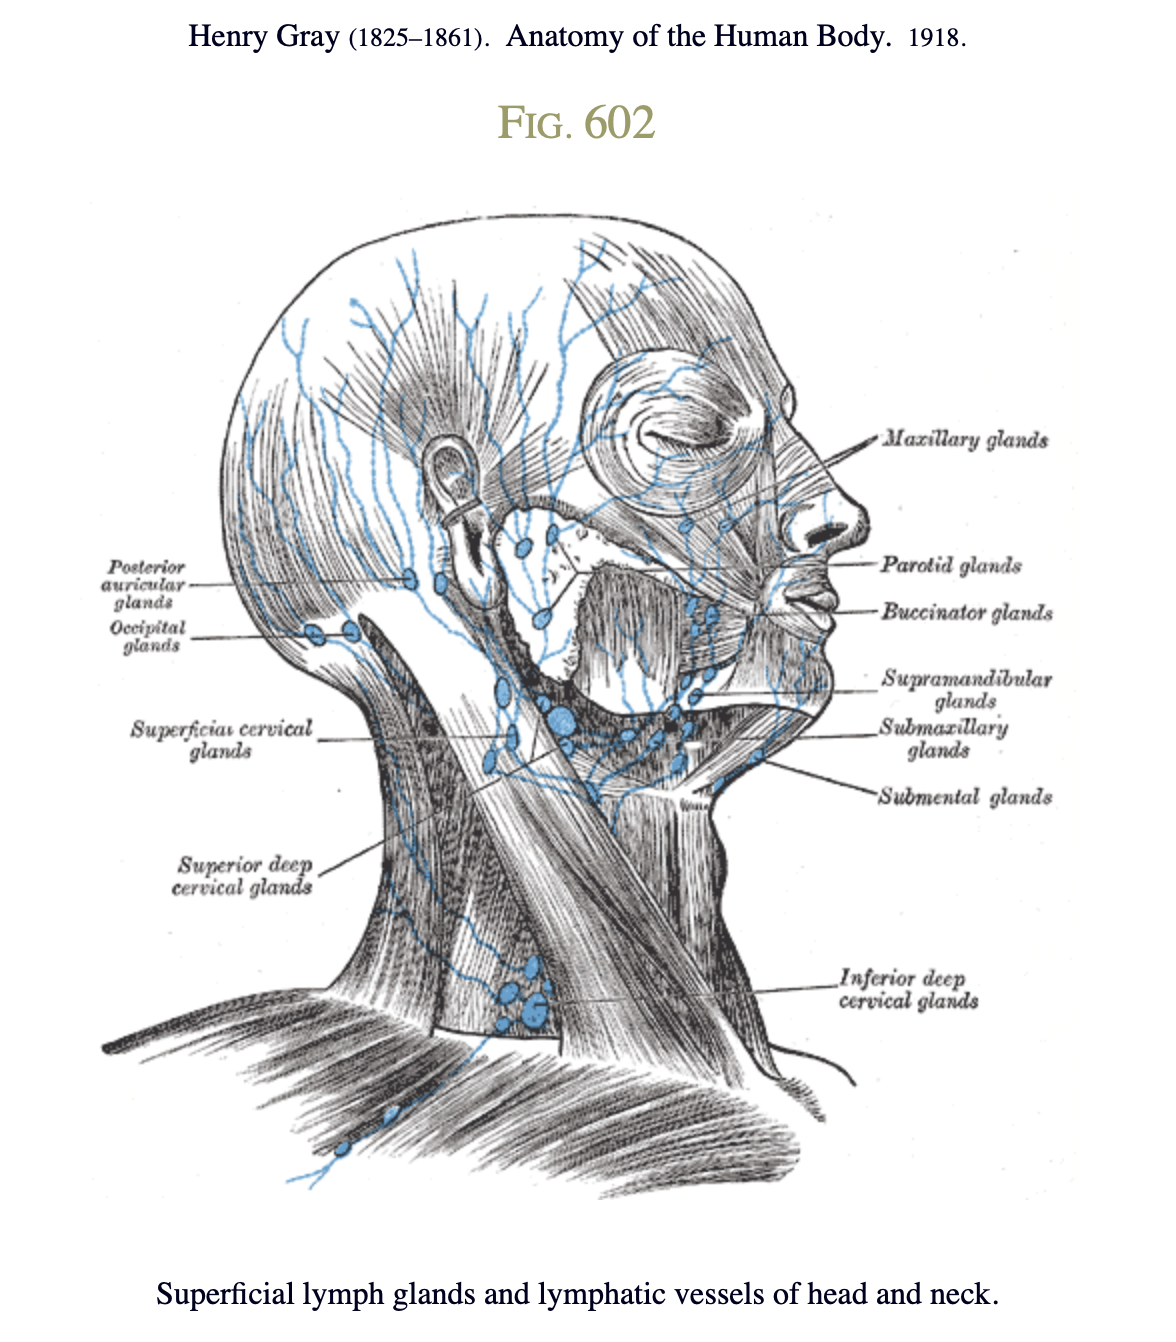
Facial gua sha is a wonderful way to aid lymphatic drainage out of the face and down the neck. Take a look at the network of lymphatic tissue present in our faces and necks:
It is also fantastic, like any form of massage, for relieving muscle tension. Look at all of those muscles who want TLC, too!
And since this is a technique that originates in Chinese medicine, it’s helpful and interesting to look at all of the acupuncture channels (meridians) that are on the face and neck that you can stimulate with facial gua sha.
Starting at the center of the face moving outward and down, these are the channels you see below:
White = Governing Vessel, also called Du (GV);
Blue = Urinary Bladder (UB);
Green = Gallbladder (GB);
Yellow #1 (below the eye and branching up the side of the face) = Stomach (ST);
Yellow #2 (beginning at the outer edge of the eyebrow and wrapping around the back of the ear) = San Jiao, also called Triple Heater/Triple Burner (SJ);
Red = Small Intenstine (SI);
Black = Large Intestine (LI)
When you see the anatomy of what lies beneath the surface of the skin on the face and neck, it makes more sense WHY facial gua sha is beneficial and also HOW to do it for the most benefit.
The flow of lymph only goes one way: towards the heart.
If you look at the anatomy drawings above you’ll see the network of lymphatic tissue that runs from the center of the face towards the ears and down the neck.
That’s exactly the kind of flow you want to have with your facial gua sha session: moving from the center of the face outward, with finishing strokes moving down the neck.
Reduce facial puffiness and fine lines with gua sha
One of the biggest positive cosmetic benefits I notice when I perform facial gua sha on myself is a reduction of facial puffiness, most notable in my cheeks.
You could say that it sculpts my cheeks.
Others may notice de-puffing on their jawline, under their eyes, or in the forehead.
The reason that facial gua sha reduces puffiness is due to the drainage of lymph out of the face and neck.
I also notice a reduction in the appearance of fine lines, especially the “number ones” or “elevens” between my eyebrows.
Using a non-toxic anti-aging eye cream (Nov 2019 update: that eye cream has been discontinued and I have replaced it with this one, and I now use a peptide serum that specifically targets vertical lines) on those same lines has helped them to fade over the last few years, but adding gua sha has helped reduce them even further. If I wake up from a night of frowning in my sleep, the evidence disappears quickly after my morning gua sha session.
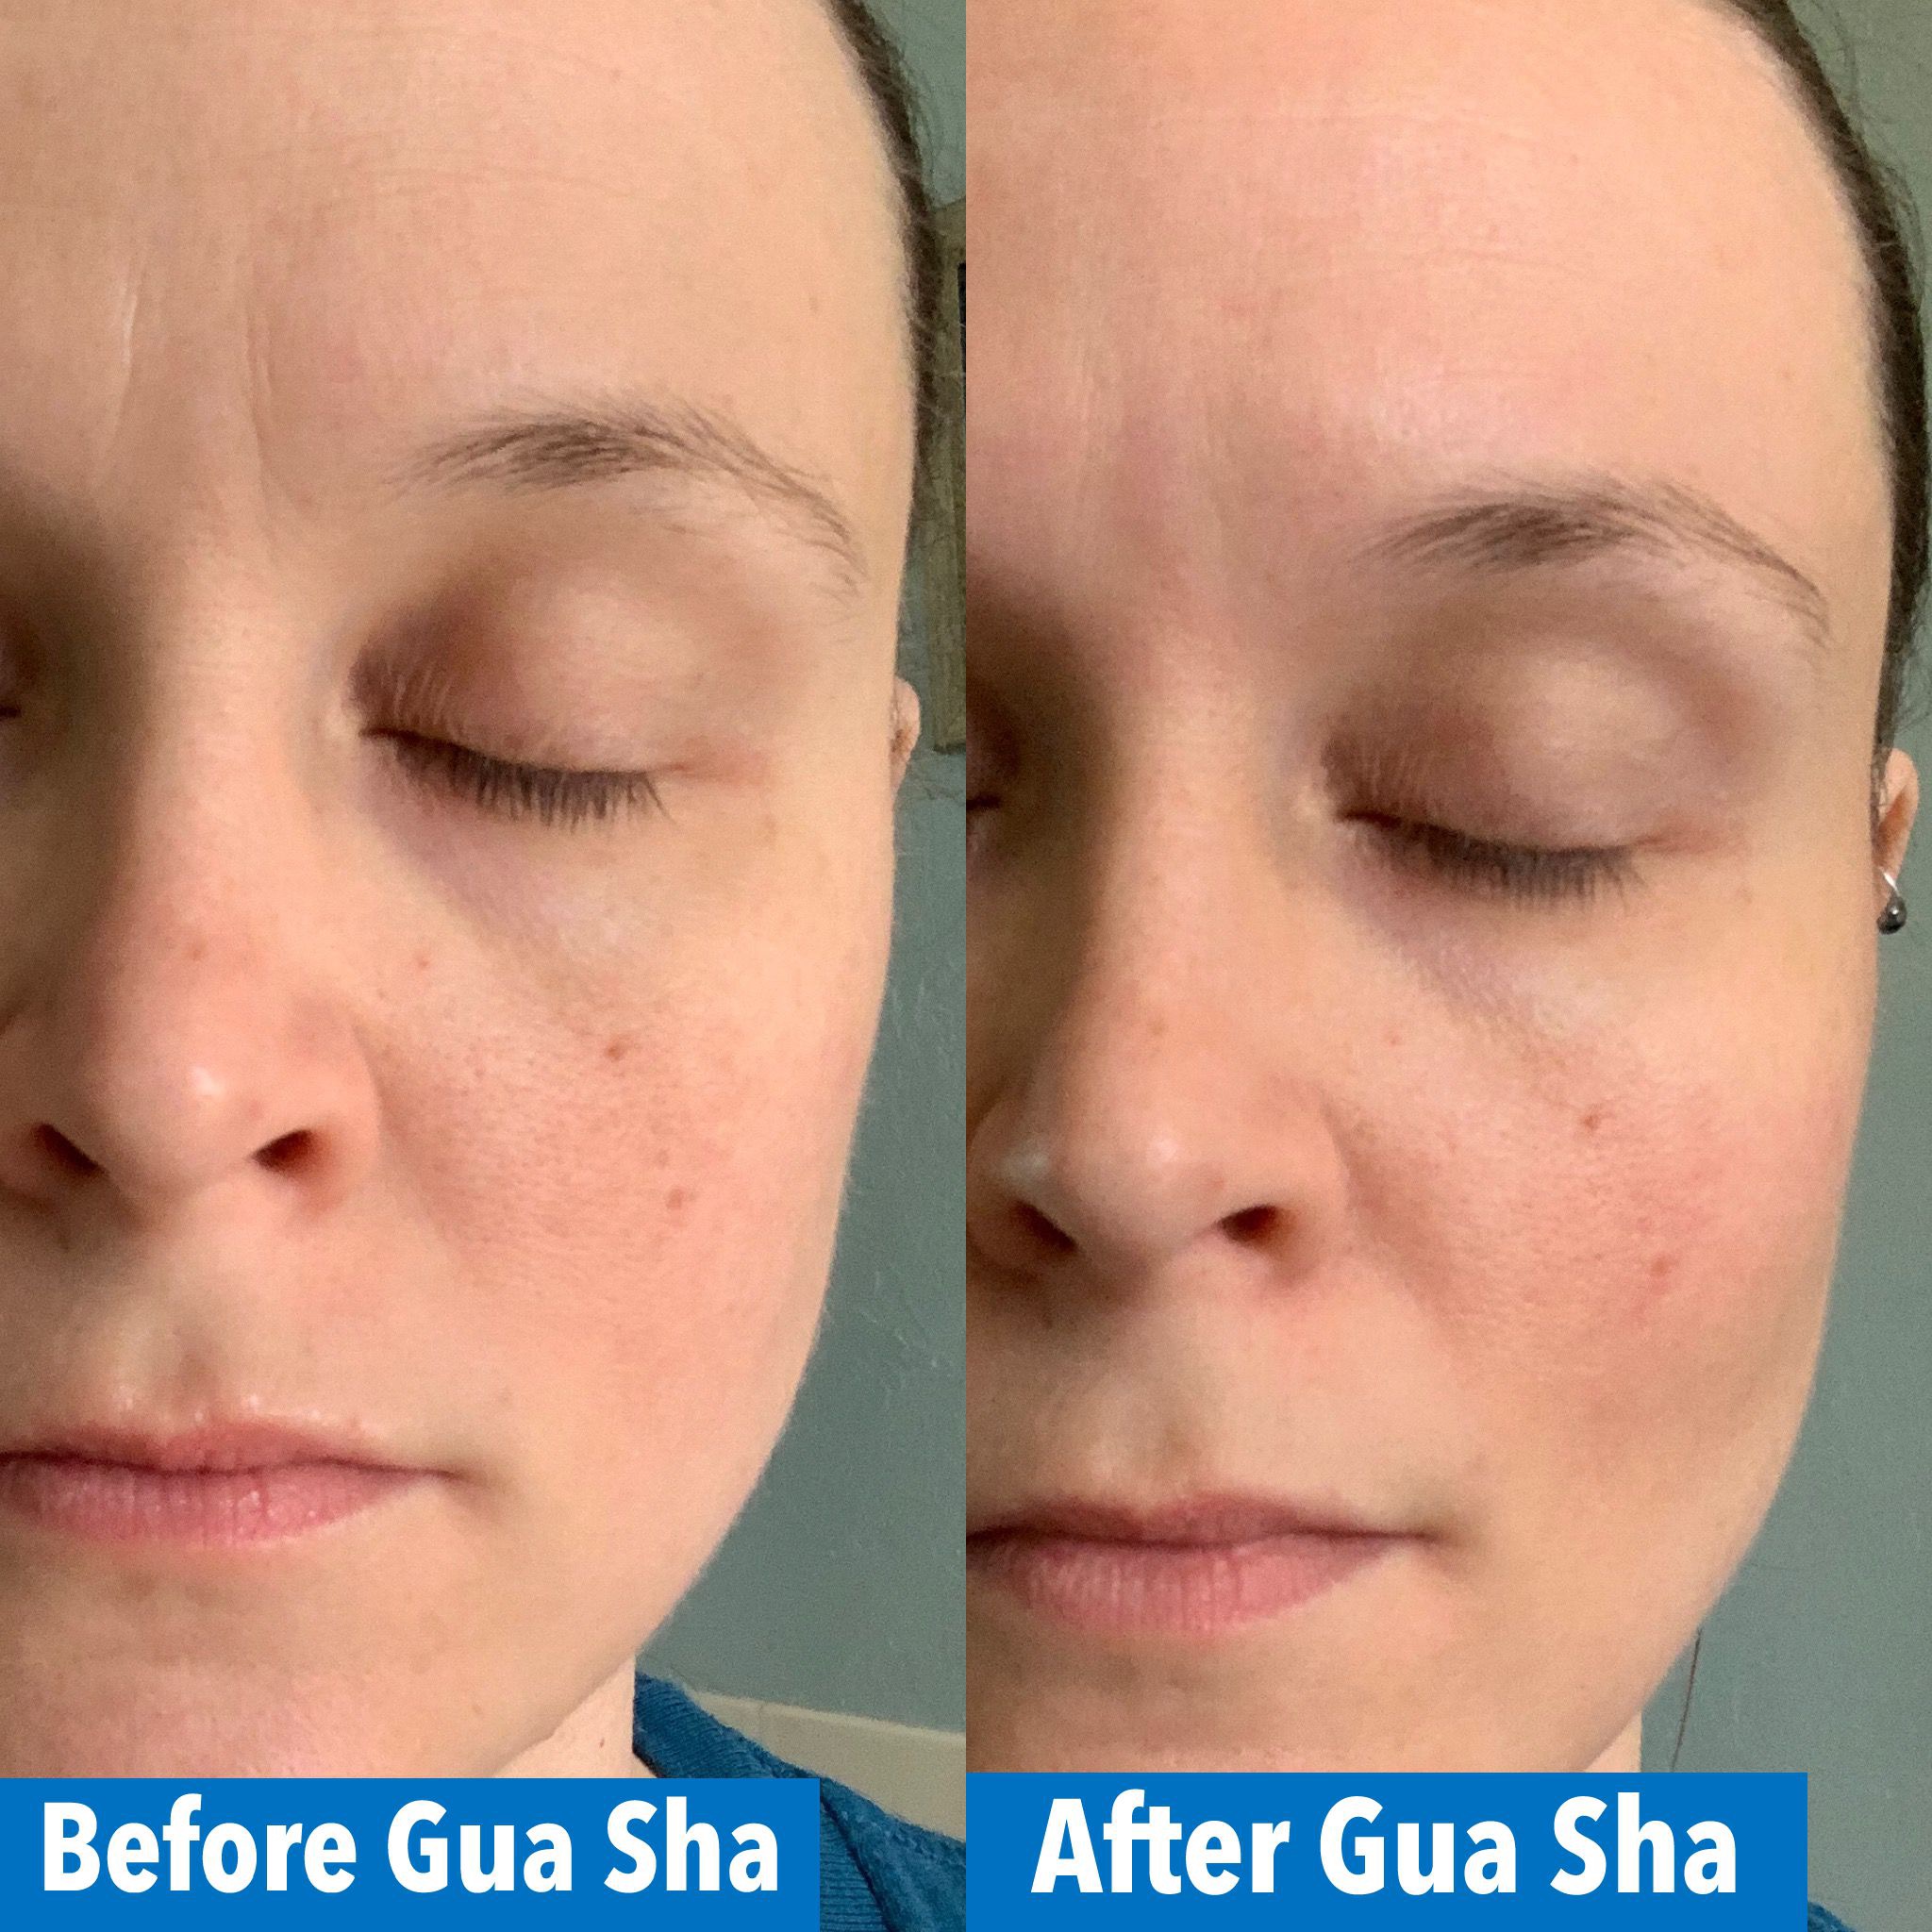
Here is one set of before and after photos, taken immediately before a gua sha morning session that lasted about 15 minutes and immediately after. There’s a big reduction in cheek puffiness, my lips are fuller, my eyes are more relaxed, and the 11’s are much less visible.
Here’s a zoomed in view:
Eyebrow Lifts with Gua Sha
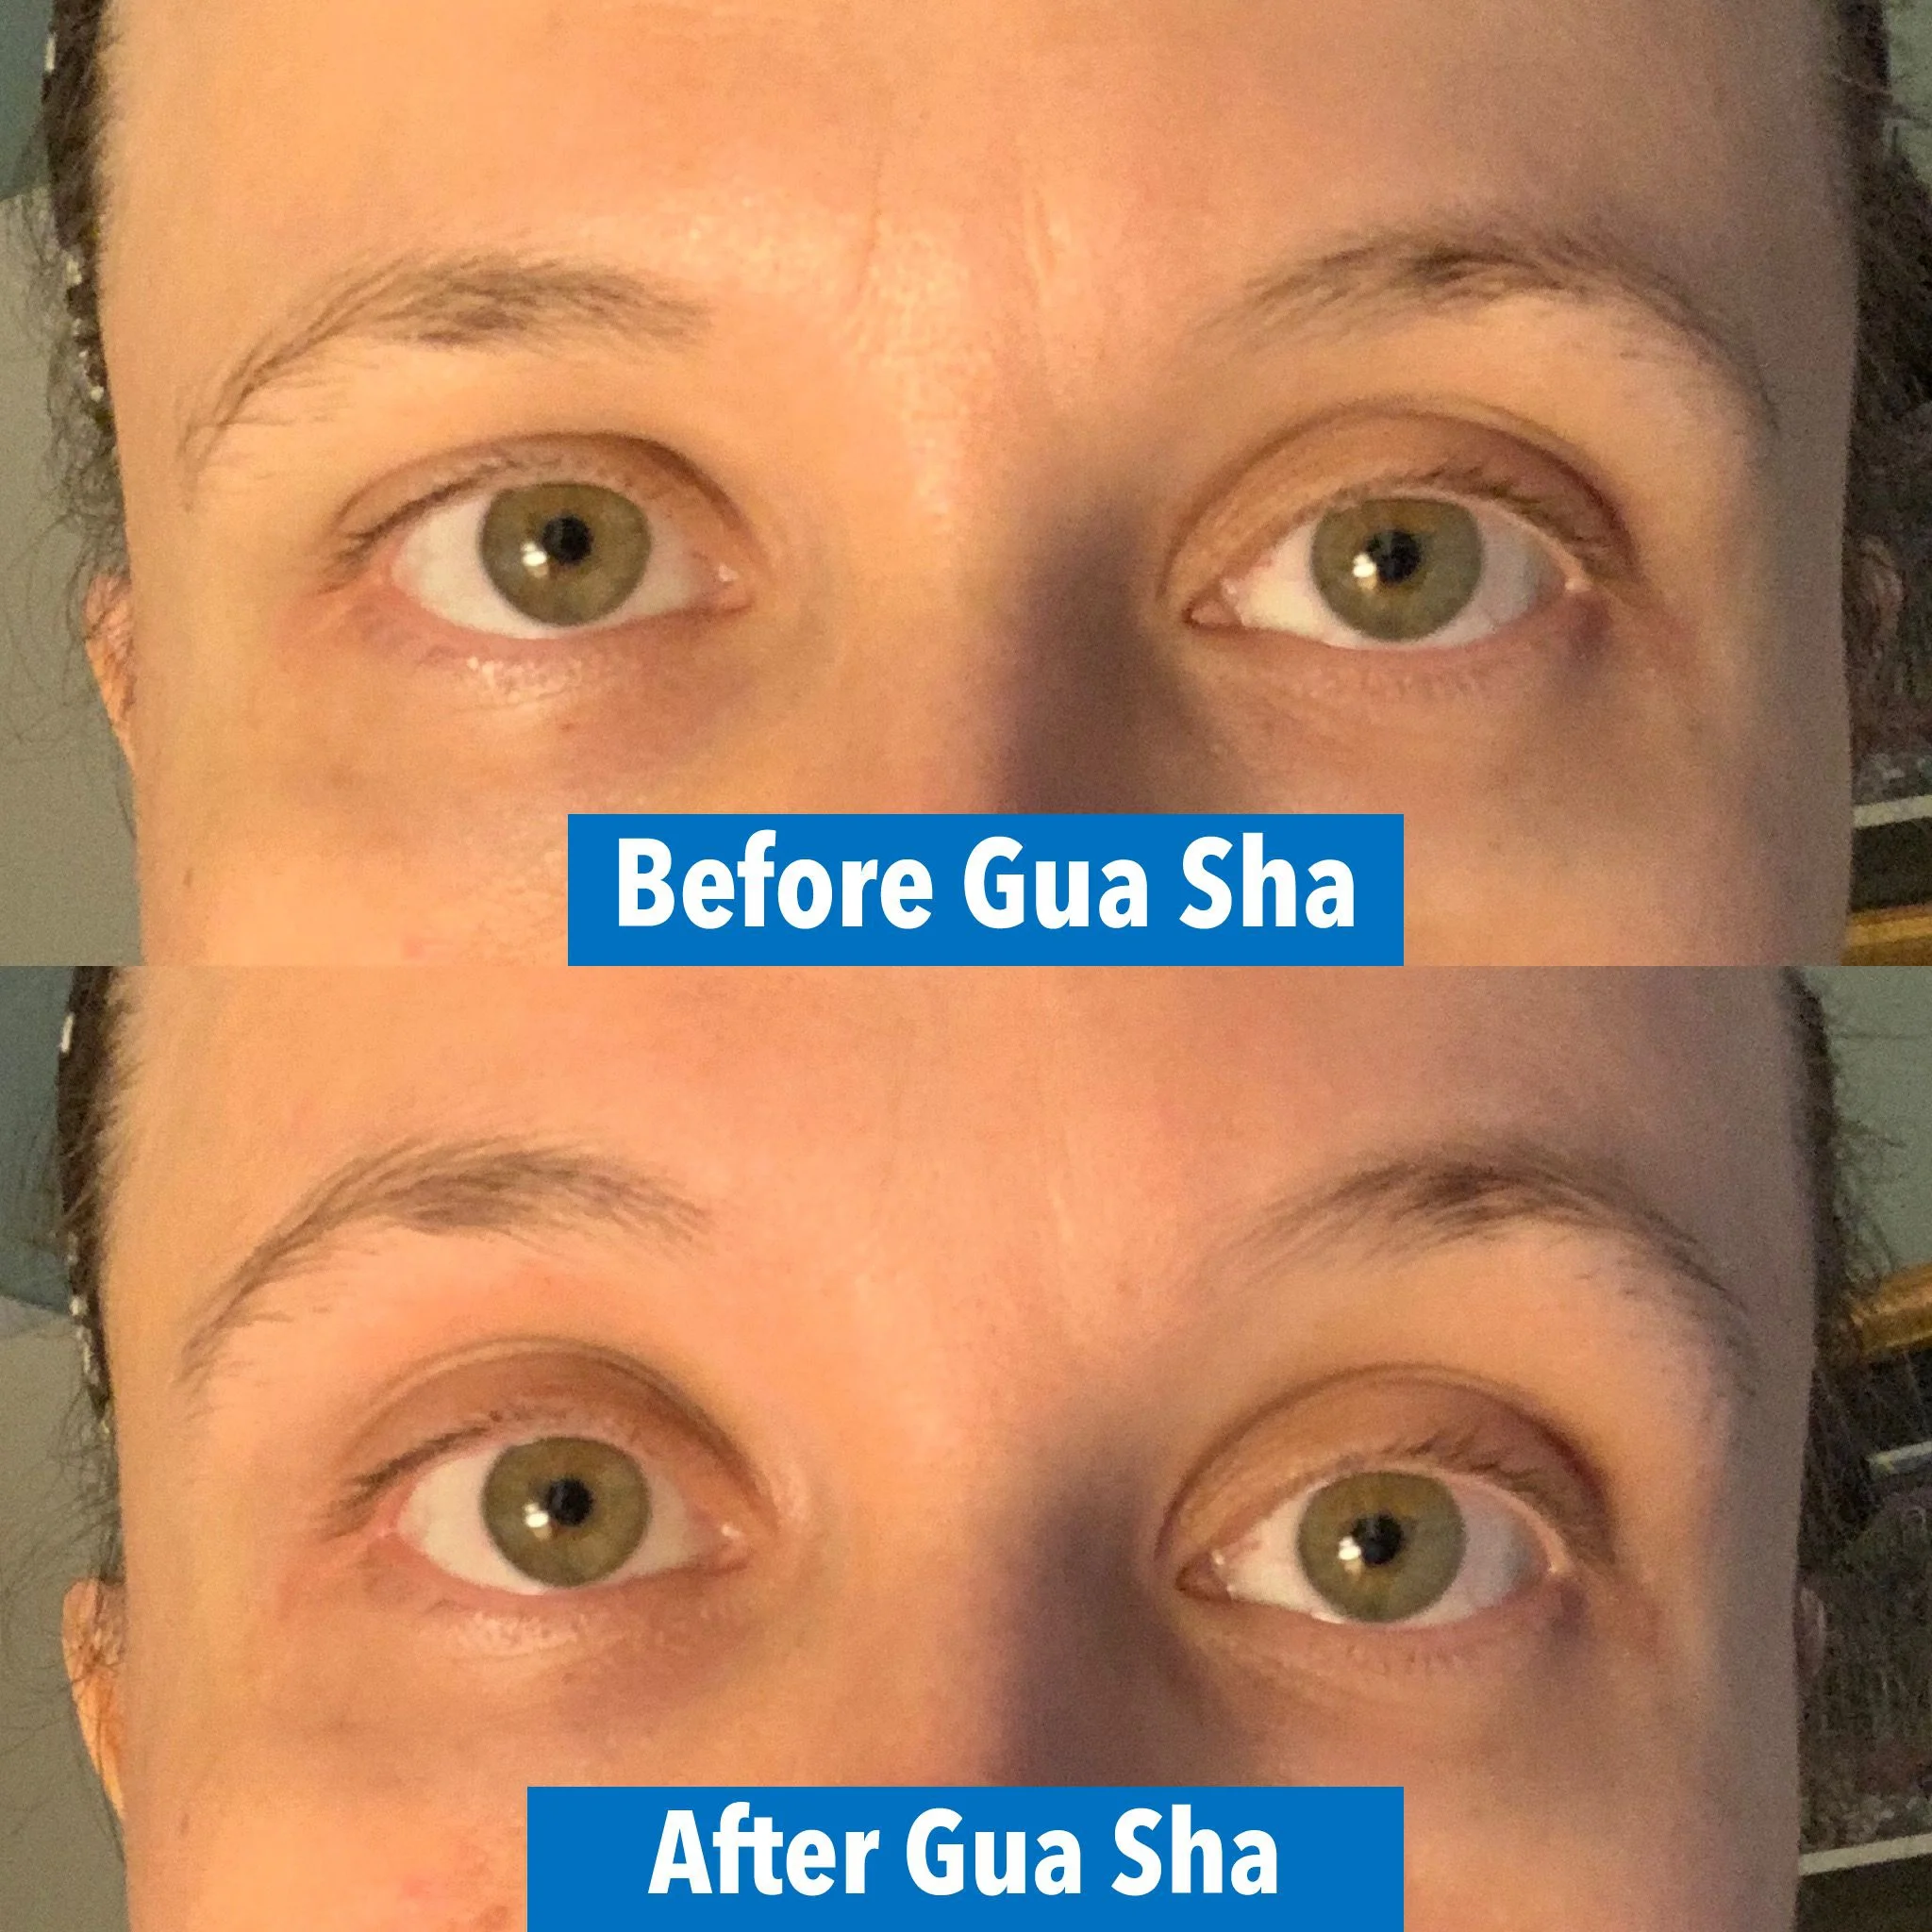
I had no idea how much of an impact gua sha made in my eyebrows until I started taking before/after photos with my eyes open. I have a “droopy” right eyelid (left side of photo below) and eyebrow and gua sha dramatically lifts both my lid and brow!
My right eye also sometimes looks crosseyed when I am staring directly into a camera. This goes away after a gua sha session as you can see in the photos below.
Look at how much more open my eyes look! I almost couldn’t believe it the first time I saw this effect, but now I see it happening every day.
I hope that over time with consistent practice that I will enjoy a permanent lifting effect.
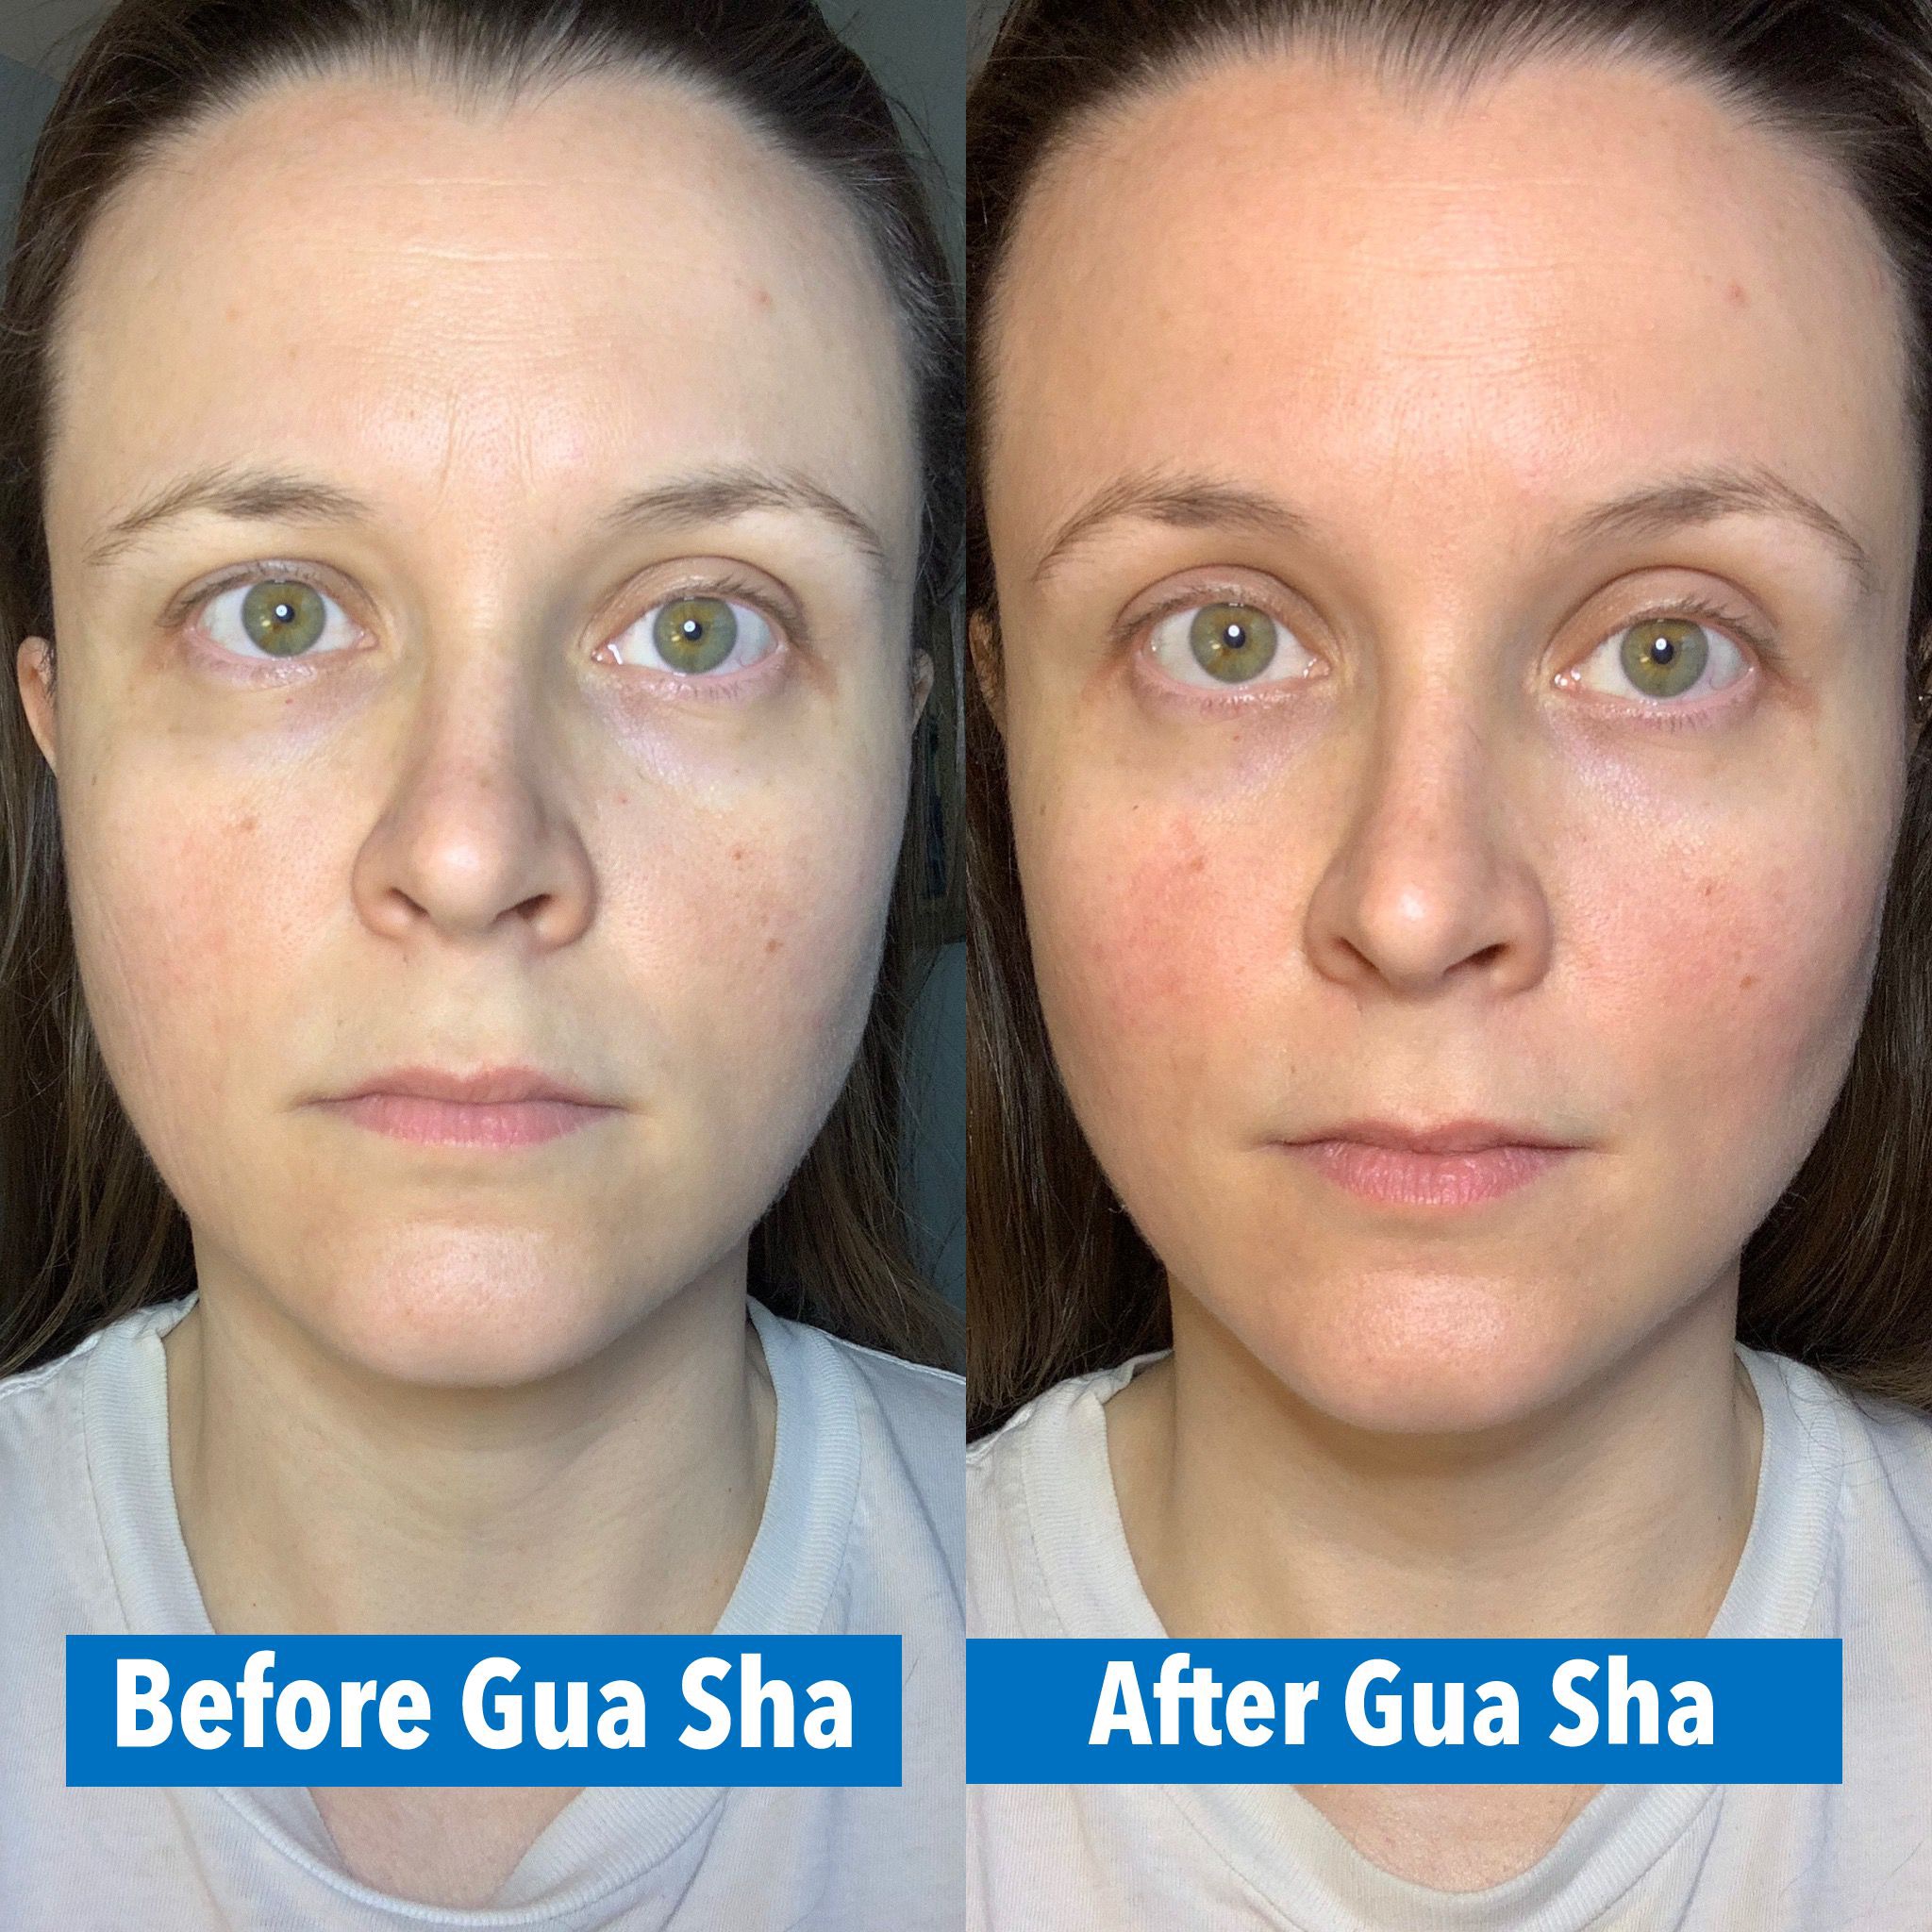
Here is another image taken in better lighting. NOTE: I used the exact same setting on my ring light to take both photos. Notice how pale I look in the before and how much more of a healthy skin tone I have after.
One more comparison shot. Notice the differences in skin tone, my right eye (left side of photo) looking less crosseyed and the lid/brow both lifted, less tension around mouth, and less visible fine lines. Forgive the expression - but I needed to relax all my muscles for it to be a proper before/after shot.
How To Do Facial Gua Sha
Gua sha is an acient folk medicine that has been used for thousands of years.
When I asked to my acupuncturist about the correct way to do facial gua sha, and shared with him a couple of different videos of “influencers” showing what they declared to be the “one correct way to do gua sha” he laughed.
Saying that there is one correct way to perform gua sha (facial or otherwise) is like saying there is only one correct way to dance, or sing, or cook a chicken.
But here’s what I have learned: committing to a daily facial gua sha practice is a fantastic way to tune into what YOUR body needs. I have honed in on my favorite routine and technique, but it is most certainly not the technique that everyone should follow.
Gua sha technique exists along a continuum where you can vary a number of factors, including the angle at which you hold the tool against your skin, the amount of pressure you apply, and how quickly you stroke the skin. None of these are wrong, they are simply different.
The best way to do facial gua sha is to practice, and play around with modifying the technique, and remember to do what feels good. If you feel pain, you are doing it wrong.
You may, however, uncover tender points (which will often correspond to acupuncture points) that are good to stimulate, but you’ll know when you cross that threshold into painful.
To me, it feels amazing to linger behind my ear and to spend extra time massaging down from that lymph node down to my collar bone. And pressing on my third eye (acupuncture point yintang) with a flat tool and slowly drawing it upwards.
But that doesn’t mean those are the only correct way to do it. You may find other movements that feel the best on YOUR face.
So here’s my advice, use my videos as a starting place to explore your own body. And don’t forget to take before and after photos so you can see how these techniques affect your skin!
Fine Tuning Your Facial Gua Sha Technique
Remember to pull the tool across your face, don’t push it. Think of spreading butter on toast. Pulling comes more naturally when you use the same hand as the side of the face you are working on; if you try to use the opposite hand you’ll be more likely to try to push the tool (this is demonstrated in the video).
For the gentlest and most relaxing type of gua sha facial, use long, slow, meditative strokes with a thicker tool laid as close to flat against your skin as possible. You can vary the pressure from light to more firm.
You can even turn it into a type of moving meditation by coordinating your breathing with the strokes.
When doing this style, it’s best to anchor the skin where you begin each stroke using your other hand. You’ll need to allot more time for this style, ideally at least 5-10 minutes, but you can drag it out even longer if you wish.
For a more invigorating facial, use rapid, short strokes with light pressure and a wider angle. I don’t like to go wider than about 45 degrees because I don’t want to risk accidentally drawing out sha marks (petechiae) which I have done before.
Use firm pressure when doing gua sha on your neck, medium pressure on your face, and feather light pressure around your eyes.
The Best Tools For Facial Gua Sha
There are a number of different classical shapes for gua sha tools. Some of them are better suited for the face.
I purchased my first tools from my acupuncturist, but I also purchased this 3-piece rose quartz set on Amazon and I really love the left “claw” shape best! It can also be nice to use all 3 tools in one session since each one excels for use in different areas of the face and neck, stay tuned for a tutorial video showing all three being used.
This set is the best gua sha set for beginners to try:
Recently I got what I call the Ferrari of gua sha tools from Lanshin Pro. It is stunningly beautiful and absolutely worth the investment, but probably not the best beginner’s tool. The comb edge can be used to buff out fine lines and wrinkles. This is my new daily go-to tool.
How To Prep The Face For Gua Sha
Gua sha, whether it is done on the face or body, must be done with some type of oil as a lubricant for the tool. Do not attempt gua sha without oil!
On the face, it must be done on freshly cleansed skin treated with some kind of hydrating toner mist.
So when doing facial gua sha, it makes the most sense to do at the end of your daily skincare regimen.
I prefer to do it in the morning since it helps my mental clarity and reduces brain fog. Plus after realizing how much it positively impacts my appearance I switched from doing it at night to doing it in the mornings. But you can do it at night, too.
My current routine to prepare my skin for gua sha is a mix of Beautycounter and 5YINA products. 5YINA is a skincare brand developed by acupuncturists and that features Chinese herbs with incredible skincare properties.
my current favorite cleanser is the Divine Bioadaptive Cleanser from 5YINA, which you rub into dry skin and then wipe away with a warm cloth. It contains mother of pearl for the most luxurious and gentle exfoliation. Sometimes I use the Beautycounter Charcoal Bar (if I’m acne-prone or feeling skin congestion) or Cleansing Balm (for a deeper pore cleanse) too.
tone with the 5YINA Quiescent Hydrolat or Beautycounter Nourishing Rosewater Mist (with hyaluronic acid) — EDIT Nov 2019: I now use the Countertime Mineral Boost Hydrating Essence instead of the rosewater mist
treat with Beautycounter Intense Moisture Serum
moisturize with Countermatch Adaptive Moisture Lotion
I rotate between the 5YINA Quiescent Beauty Oil and either the No 1 Brightening or No 3 Balancing Facial Oil from Beautycounter
AFTER I have done gua sha I will apply the Beautycounter Countertime Ultra Renewal Eye Cream to my under eye area. I don’t want to spread the eye cream all over my face, that’s why I wait until I’m finished with gua sha
At the end of your gua sha session, your skincare products should be very well worked into your skin and it should not feel oily.
The 5YINA oils absorb much faster and more completely into your skin vs the Beautycounter since they use different oils as the base.
If you aren’t sure which oil is best for your skin type, please fill out my skincare consultation (look for the big button below) and I will help you choose!
Jade Rolling Vs Gua Sha
I like to call jade rolling “gua sha lite”. It is a lovely practice, and can feel really good, but I have never seen it make a noticeable difference in facial inflammation/puffiness or do anything to reduce fine lines on my face.
However, it is much gentler than gua sha and you can roll your whole face much faster than you can do a gua sha session.
You do not need to use an oil to use a roller on your face. If you prefer to use only cream-based moisturizers, you can use a roller on top to work them in.
I also like to use my jade roller to help work skincare products into my skin. It can be a fantastic way to finish a gua sha session to work any extra facial oil into your skin.
It can be easier to use a roller on your under eye area vs a gua sha tool.
I learned a use for jade rollers from an acupuncturist I follow on Instagram: breast massage. You can read about how to do that in this blog post. It definitely helps with PMS breast tenderness, and is incredibly relaxing to do in bed just before going to sleep.
I did purchase my jade roller on Amazon, and it comes with a bonus heart-shaped gua sha tool!
Contraindications For Facial Gua Sha
Do not do gua sha on fresh botox. Talk to the provider who injected it to find out how soon you can safely implement facial massage.
Do not do gua sha on top of injected fillers in the face.
It’s best to consult with an acupuncturist if you are dealing with any kind of skin problems like acne or rosacea. It’s best not to do scraping on top of areas of active inflammation, but to instead do the strokes on the other areas of the face, and especially on the neck to promote lymphatic drainage.
You can place your gua sha board in the fridge or in a bowl of ice water (just dry it off first) and press it gently into areas of inflammation.
If you’d like custom recommendations for skincare based on your skin’s needs, please take a few minutes to fill out this skincare consultation questionnaire and I will get back to you as soon as I can with regimen suggestions.
If your facial skin is just too sensitive for gua sha, you can start with jade rolling instead and hopefully work up to being able to do gua sha.
Video Demonstration of Facial Gua Sha
This video contains more information in the beginning and then a thorough demonstration to empower you to begin your own facial gua sha practice.
Please tag me on Instagram @thecuriouscoconut when you do your facial gua sha! And please reach out with any questions.
Want more skincare discussion? Join my Clean Beauty Community!
If you like FREE GIFTS and other special promotions then you definitely need to join my Clean Beauty Community in one of these three spaces. These are the ONLY places you will ever hear about gifts with purchase or other fun things like giveaways that are related to skincare, cosmetics, and personal care products.
You can join on Facebook:
You can join on Instagram here: http://instagram.com/cleanbeautycommunity
And you can join my special newsletter by filling out the form below:
Pin this for later:
Facial gua sha is trendy, but are you doing it right? Learn everything you need to know to start doing the best possible facial gua sha routine for YOUR body. Benefits include lymphatic drainage (and reduced puffiness), softer, smoother skin, reduction in fine lines, and a brighter more even complexion!
References Cited
Marion, T., Cao, K., & Roman, J. (2018). Gua Sha, or Coining Therapy. JAMA Dermatology , 154(7), 788.
Cai, G.-Y., Chen, Q.-W., Lin, L.-H., & Yao, Z.-Y. (2018). Gua Sha therapy for treating perimenopausal syndrome: Protocol for a systematic review. European Journal of Integrative Medicine, 17, 40–44.
Marion, T., Cao, K., & Roman, J. (2018). Gua Sha, or Coining Therapy. JAMA Dermatology , 154(7), 788.
Min, Y., Hongyan, Z., Rongzhao, Y., Qinchuan, S., & Yaoyao, B. (2018). Gua Sha attenuates thermal hyperalgesia and decreases proinflammatory cytokine expression in serum in rats with lumbar disc herniation induced by autologous nucleus pulposus. Journal of Traditional Chinese Medicine = Chung I Tsa Chih Ying Wen Pan / Sponsored by All-China Association of Traditional Chinese Medicine, Academy of Traditional Chinese Medicine, 38(5), 698–704.
Ren, Q., Yu, X., Liao, F., Chen, X., Yan, D., Nie, H., … Zhou, X. (2018). Effects of Gua Sha therapy on perimenopausal syndrome: A systematic review and meta-analysis of randomized controlled trials. Complementary Therapies in Clinical Practice, 31, 268–277.
Saha, F. J., Brummer, G., Lauche, R., Ostermann, T., Choi, K.-E., Rampp, T., … Cramer, H. (2019). Gua Sha therapy for chronic low back pain: A randomized controlled trial. Complementary Therapies in Clinical Practice, 34, 64–69.
